Because sometimes you need something, and you need it RIGHT NOW!
We were on the train, Amtrak to be exact, to West Virginia. It was 6 am, and the sun was up, and I had been awake since 2. I was tired, grumpy, and only wanted to sleep. Unfortunately, the light was making it tough. Luckily, I had my size 9 needles and a skein of black Riverstone wool worsted in my knitting bag. I quickly whipped up a pattern in my head: cast on 18 stitches, knit 3 rows, purl 1, (to make a lifted rib to keep it from being heavy on my eyes) for 20 rows, then decrease at the bottom edge for 4 rows, then increase at the bottom edge for 4 rows, then repeat the purl 1 row, knit 3 rows back for 20 rows. Bind off. I wove in the ties (using the remnant of the long tail cast on for one tie).
The increasing and decreasing made the notch for my nose. It really worked suprizingly well, and by 7:30 or so, I had a functioning sleep mask.
The other passengers must have been SOOOOOO jealous.
Showing posts with label wool. Show all posts
Showing posts with label wool. Show all posts
Tuesday, December 30, 2008
Saturday, March 29, 2008
aqua necklace
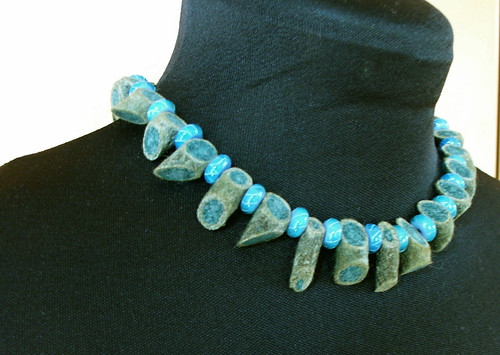
My newest creation over at etsy. This felted necklace has been treated so that all those hard edges will remain nice and sharp. The glass beads that I used as spacers are absolutely delicious, and I have to admit that I was tempted to keep them for myself. I also used some cute cute cute green polka dot glass beads around the back of the necklace, so that it would feel nice and smooth against your neck.
There you go. It is for sale in my etsy shop. Go get it.
Friday, March 21, 2008
New Endeavor

I just published my first instructable:
http://www.instructables.com/id/Make-a-wet-felted-wool-curly-que/
I used the video's that I have posted here on the blog, but now they have some written instructions and some additional edifying images.
Enjoy!!!!
http://www.instructables.com/id/Make-a-wet-felted-wool-curly-que/
I used the video's that I have posted here on the blog, but now they have some written instructions and some additional edifying images.
Enjoy!!!!
Wednesday, March 19, 2008
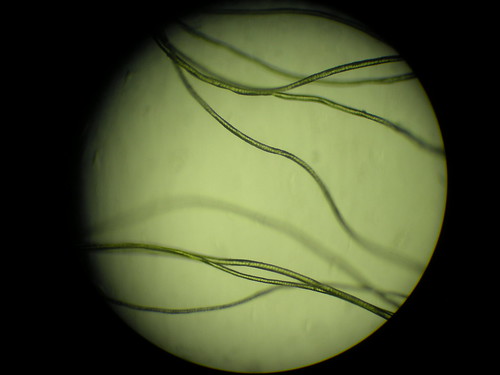
corriedale 100x
THE SCALES! LOOK AT THE SCALES!!!
Yup...that is what makes this stuff felt so well....
When you heat these fibers up, those scales flip open and just grab each other like crazy.
LOVE IT.... I really do.
Sunday, March 16, 2008
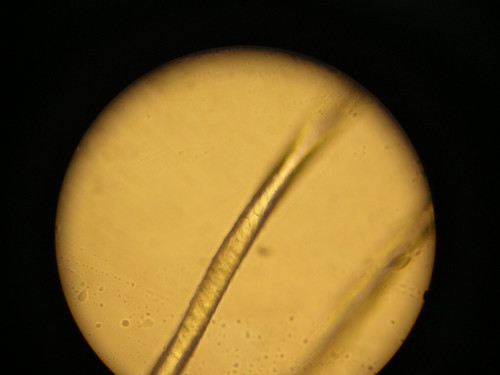
Cashmere 100x
When art and science meet.....it can be a beautiful thing. In Forensic Science class last week, I was teaching my students how to recognize different fibers microscopically. While they were looking at fiber samples through the microscopes, I took some photos of thier best samples. I thought that I would share some of the better ones with you.
I took this with my camera, a steady hand, my students and a microscope. Yes, it is green dyed. If you look at the image in the largest format, you can see the cuticle scales on each fiber.
Monday, February 25, 2008
Felting Tutorial Part 3: Curly-que
Welcome to Part 3 of my felting tutorial on making a Curly-que.
Part 3 covers how to shape the Curly-que, after it has been formed and wet felted. You can find Parts 1 and 2 posted yesterday and the day before!
 I would also like to give a big shout out to Linda over at The Craftgossip Blog Network, who picked up Parts one and two of my tutorial on the felting section of her blog today. You ROCK!!!
Part 3 covers how to shape the Curly-que, after it has been formed and wet felted. You can find Parts 1 and 2 posted yesterday and the day before!
I would also like to give a big shout out to Linda over at The Craftgossip Blog Network, who picked up Parts one and two of my tutorial on the felting section of her blog today. You ROCK!!!Sunday, February 24, 2008
Felting Tutorial Part 2: Curly-que
Here is part 2 of my Video Felting Tutorial: Felting a Curly-Que.
This portion of the tutorial covers the actual process of wet felting around the wire form. Part 1 covered how to wind the felt around the wire form and prepare it for wet felting. (If you haven't seen Part 1, it is in yesterday's post!)
Enjoy!
Link to part 1 of the tutorial here: Take me to it!
This portion of the tutorial covers the actual process of wet felting around the wire form. Part 1 covered how to wind the felt around the wire form and prepare it for wet felting. (If you haven't seen Part 1, it is in yesterday's post!)
Enjoy!
Link to part 1 of the tutorial here: Take me to it!
Saturday, February 23, 2008
Felting Tutorial Part 1: Curly-que
 I thought that it would be fun for me to start filming a series of tutorials on some basic felting techniques.
 So here is the first in that series: How to wet felt a curly-que, just like the one you see here!
These little curls are really useful as embellishments or as fun elements in larger pieces, I use them all the time. Besides, they are a great place to start because they work up quick, don't take much roving, and they are just as whimsical as all get out. They can take something that is kind of ho-hum and elevate it. They can also be just the thing to add a touch of the organic to a piece that is feeling a little staid or static.
I hope you enjoy part 1 of this tutorial, parts two and three will follow shortly!
Part 1: Taming the wool (The wind up)
Part 2: Prepare to get wet (Felting it up)
Part 3: Taking shape (Forming the curl)
Tuesday, July 10, 2007
Lovely and Lonely

This is what you get when you try to be good.
I have a pile of flat felt that I made waiting to become flowers and a growing herd of beads dying to be turned into jewelry. None of that can happen until I finish certain other obligations.
Phooey on obligations. Phooey I say.
Today may be made for my online classes, but the night will be made for felting (or assembly of already felty-goodness as the case may be)...
And it will be good...
Thursday, July 5, 2007
Birth of a Felted Flower

Making one of my felted flowers starts with the felt. Which involves bowls of water, a little soap, and lots and lots and lots of rubbing and rolling.

First I lay out the roving and blend the colors for the basic petals of the flower. Sometimes the felt will be thicker, sometimes it will be thinner. It all depends on the effect I am going for.
Then I wet it, sandwich it in crinkly plastic and bubble wrap and rub, rub, rub. You get very prune-like fingers doing this stuff. You then wet it and rub some more.

When the fibers start to come together, I will then start to roll the mat of fibers. I will roll it roll it roll it and roll it. Are we starting to see a theme? Af ter rolling for a good long while (enough time to get some serious NPR listening in) I test it to see if it is felted. If I can pull up some fibers then it needs more rolling. After I am happy with the felting, it has to be fulled, which will really lock the fibers in place. This involves more rolling. Rolling. Rolling. And soapy water.
 ter rolling for a good long while (enough time to get some serious NPR listening in) I test it to see if it is felted. If I can pull up some fibers then it needs more rolling. After I am happy with the felting, it has to be fulled, which will really lock the fibers in place. This involves more rolling. Rolling. Rolling. And soapy water.
 Finally, after a good hour or more of rubbing, rolling, wetting, checking, cursing, rolling, and rolling a bit more, I get a peice of fabric that won't fall apart, that I can then cut into pieces to sculpt into a flower.

This felt will be a flower inspired by a coverlet of my great-grandmother's that I inherited. It was full of these strange grey/blue/lavender rose-peony hybrids that existed no-where but on Grans' featherbed.
Subscribe to:
Posts (Atom)


