So, I got all linkedy linked today and sorta featured in a blog write up on the joys of wool and felt, if you go to Moods and Appetites, you can see it. They pictured my Winter Majesty Necklace. You can also see some other impressively amazing felt work by some artists that totally make me drool, and who I DO NOT feel worthy to be pictured with.
I shamefully COVET that felted cat skull. Morbid? Yes. Fantastic? Abso-freakin-lutely!
Just call me Garth...
I'm not worthy....I'm not worthy....I'm not worthy
Showing posts with label felt. Show all posts
Showing posts with label felt. Show all posts
Thursday, December 11, 2008
Tuesday, June 3, 2008
Library Loving
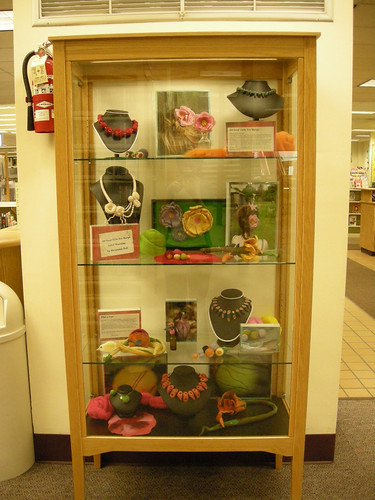
So my little exhibit at the library went up yesterday. It was the first time that I had done anything like that and I think that it looks pretty good. It took me some time to finesse it to where I was happy with the display, but in the end, I was pleased. It was a combination of my felt work and some photos of my felt being worn. It is just one display cabinet, but it is a start! It runs for the whole month of June, and at least now I can say that I have had an exhibit!
I also included an artist statement and a bit about the history of felting, as well as some of my microscope images of wool fibers.
Sunday, May 25, 2008
Multitasking
Talk about multi-tasking...
Even now, as I write this, I am being the consummate felting multi-tasker. I am listening to an audio book on my computer that is engaging of plot and amusing in the reading. I am fulling a new batch of felt (my third today) under my feet by rolling my bubble wrapped bundle of felt on a towel under the table while my husband looks on in horror. And finally, I am writing this missive to you. Not bad on a lazy lovely Sunday. I am busily making flat felt to turn into flowers for a little exhibition at the local library....hopefully I will have enough to fill the case and make it interesting.
Even now, as I write this, I am being the consummate felting multi-tasker. I am listening to an audio book on my computer that is engaging of plot and amusing in the reading. I am fulling a new batch of felt (my third today) under my feet by rolling my bubble wrapped bundle of felt on a towel under the table while my husband looks on in horror. And finally, I am writing this missive to you. Not bad on a lazy lovely Sunday. I am busily making flat felt to turn into flowers for a little exhibition at the local library....hopefully I will have enough to fill the case and make it interesting.
Saturday, March 29, 2008
aqua necklace
My newest creation over at etsy. This felted necklace has been treated so that all those hard edges will remain nice and sharp. The glass beads that I used as spacers are absolutely delicious, and I have to admit that I was tempted to keep them for myself. I also used some cute cute cute green polka dot glass beads around the back of the necklace, so that it would feel nice and smooth against your neck.
There you go. It is for sale in my etsy shop. Go get it.
Friday, March 21, 2008
New Endeavor

I just published my first instructable:
http://www.instructables.com/id/Make-a-wet-felted-wool-curly-que/
I used the video's that I have posted here on the blog, but now they have some written instructions and some additional edifying images.
Enjoy!!!!
http://www.instructables.com/id/Make-a-wet-felted-wool-curly-que/
I used the video's that I have posted here on the blog, but now they have some written instructions and some additional edifying images.
Enjoy!!!!
Monday, February 25, 2008
Felting Tutorial Part 3: Curly-que
Welcome to Part 3 of my felting tutorial on making a Curly-que.
Part 3 covers how to shape the Curly-que, after it has been formed and wet felted. You can find Parts 1 and 2 posted yesterday and the day before!
 I would also like to give a big shout out to Linda over at The Craftgossip Blog Network, who picked up Parts one and two of my tutorial on the felting section of her blog today. You ROCK!!!
Part 3 covers how to shape the Curly-que, after it has been formed and wet felted. You can find Parts 1 and 2 posted yesterday and the day before!
I would also like to give a big shout out to Linda over at The Craftgossip Blog Network, who picked up Parts one and two of my tutorial on the felting section of her blog today. You ROCK!!!Sunday, February 24, 2008
Felting Tutorial Part 2: Curly-que
Here is part 2 of my Video Felting Tutorial: Felting a Curly-Que.
This portion of the tutorial covers the actual process of wet felting around the wire form. Part 1 covered how to wind the felt around the wire form and prepare it for wet felting. (If you haven't seen Part 1, it is in yesterday's post!)
Enjoy!
Link to part 1 of the tutorial here: Take me to it!
This portion of the tutorial covers the actual process of wet felting around the wire form. Part 1 covered how to wind the felt around the wire form and prepare it for wet felting. (If you haven't seen Part 1, it is in yesterday's post!)
Enjoy!
Link to part 1 of the tutorial here: Take me to it!
Saturday, February 23, 2008
Felting Tutorial Part 1: Curly-que
 I thought that it would be fun for me to start filming a series of tutorials on some basic felting techniques.
 So here is the first in that series: How to wet felt a curly-que, just like the one you see here!
These little curls are really useful as embellishments or as fun elements in larger pieces, I use them all the time. Besides, they are a great place to start because they work up quick, don't take much roving, and they are just as whimsical as all get out. They can take something that is kind of ho-hum and elevate it. They can also be just the thing to add a touch of the organic to a piece that is feeling a little staid or static.
I hope you enjoy part 1 of this tutorial, parts two and three will follow shortly!
Part 1: Taming the wool (The wind up)
Part 2: Prepare to get wet (Felting it up)
Part 3: Taking shape (Forming the curl)
Tuesday, February 19, 2008
ON pins and Pins

Hair Pins...something new to do with my hardened felt:
I had these left over felt beads that had already been hardened with the acrylic so I had to figure out what to do with them. I am kind of over seeing buttons stuck on the end of bobbie pins...but I thought that my felt disks were quite different!

Now I think that I shall whip out a few of these whenever I have some left over bits at the end of a necklace making session...
Tuesday, December 25, 2007
Christmas Gifting
So...I haven't been able to show you much of what I have made lately, because it was intended for Christmas gifting, but as a couple of the recipients are in transit and out of range of the possibility of Internet corruption, I can reveal a few of the goodies I put together, but only a few:
I whipped up some felted soaps for stocking stuffers:

I made a gift box of 20 handmade cards for my mother to send. I thought that this would be a nice gift. They tend to be cute, as does she....

....but a few trend to the artsy...

The other goodies I can't show yet! I plead for patience!
Sunday, December 9, 2007
Raw Bones: Felted necklace

This is the "Raw Bones" felted necklace. When I finished the snake, treated it with the acrylic, and cut it, I thought that it looked like uncooked bones....which is kind of creepy to me, being a vegetarian. However, with the little rose quartz spacers and the touch of red coral, it turned out to be quite the engaging necklace. The upward facing side of the cut beads really does frame the face.

Even if it is a little...morbid?

Sunday, December 2, 2007
Felt Heirloom Roses


So...I am off the Peonies for a little bit and on to Heirloom Roses. I consider this little guy to be an heirloom rose, cause he is so open. Aren't those the roses we always remember as smelling the best and lasting the longest, even if they were not the most showy in the garden?
This 4 inch wet felted and hand beaded beauty with needle felted details would dress up any ensemble, from a simple black turtleneck, to a blushing pink evening gown. It also looks spectacular in a chignon, and that is why it is convertible from a hair fork mounting to a traditional corsage pin.


I love making these, and I made the flat felt for this over the summer, and had it sitting about for a while waiting for it tell me what it wanted to be. Last night it whispered to me...so I helped it along.
Wednesday, November 28, 2007
How I love my Newsday!
So tomorrow I am in Newsday again! Yippeee!!!
The link to the web version is above....psssst I'm #5.
SWEET!!!!
Guess I am going to need to make more flowers this weekend!

Saturday, November 24, 2007
Winter White Majesty Necklace


This is the Winter Majesty Necklace. It is a blend of cream and white merino and corriedale rovings that were wet felted and then sculpted. It is embellished with freshwater pearls and some very tiny sweet pearly seed beads. I simply adore the sculptural nature of this piece, and think that it is one of the most visually interesting and inspired things I have made in some time.

I can imagine the White Witch of you-know-where wearing this to a garden party before she drinks some sweet pale wine. It would look amazing with a simply cut evening dress....or a black V-neck T-shirt. It would be divine for a winter wedding! It weighs hardly a thing for being so substantial.

The process of building it was really organic, in that I started with the curly-cues and then went out from there, adding elements and sculpting parts as the necklace called for them. The part that is slightly redolent of a marriage between an open egg and a bird's nest dusted with spun sugar was actually felted around a small stone from my garden, which I then freed from it's woolly captivity. The tiny felt and pearl "cameo" on the opposite side is the doorway through which the stone made it's exit.
I'm almost too much in love with it to let it go....almost, but not quite. It could be yours...just go to Etsy.

Thursday, November 22, 2007
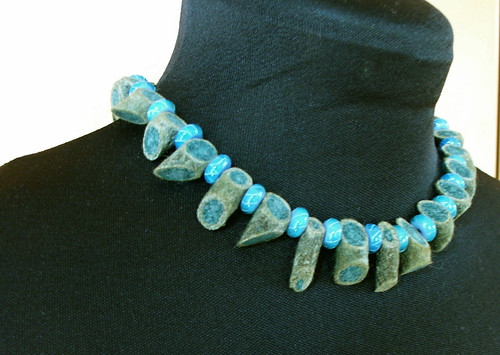
Blue felt necklace

I just completed this blue felt necklace...somewhere between making the mushroom galette and the vegetable broth. I had to to take a break from the cooking and so THIS was my thanksgiving. It is made from a rope of wool felt which was layered in different colors before felting.  After I wet felted it and it was dry, I soaked it in a liquid acrylic polymer so that it could be cut and it would keep it's sharp edges. I cut it and strung it today. The necklace is just shy of 15 inches long, so it lays ever so elegantly against the collar bone. The beads are glass and the clasp is silverplated and magnetic (so it goes on SOOOOOO easily). I love it, because it gives a great pop of color around the face and is a real statement peice. It is for sale on Etsy as we speak.
After I wet felted it and it was dry, I soaked it in a liquid acrylic polymer so that it could be cut and it would keep it's sharp edges. I cut it and strung it today. The necklace is just shy of 15 inches long, so it lays ever so elegantly against the collar bone. The beads are glass and the clasp is silverplated and magnetic (so it goes on SOOOOOO easily). I love it, because it gives a great pop of color around the face and is a real statement peice. It is for sale on Etsy as we speak.Sunday, November 18, 2007
Wet Felting Flower Seminar with Carol Cypher

So, I said that it would be coming and here it is. The complete rundown on the Carol Huber Cypher workshop that I went to last weekend. If you can imagine that lovely wooley smell that is slightly redolent of wet dog, then you can feel like you were actually there. 

We arrived and were greeted with a long table covered in luscious wool. It was full of little bags filled with roving in stunning color combinations. We each chose our seats and our bags, fully geared up for a full day of felting and fulling. ( Could I use the word "full" there a few more times?)

Then it was time to design our flowers for our lariats. Mine started out looking like the love child of Cousin It and Man Ray. They were puffy and lovely and tempting to pet, but always remember and never forget: Don't pet the felt!
 The water came out and it was time to start felting....and rubbing and felting and rubbing some more...with intermittent peeks to check on the progress of the flowers.
Next we moved on to the fulling and shaping of the flowers. Folks went wild here, some ended up with multi-petaled rose/violet hybrids that exist no where but in the imagination. My flower called out to be a trumpet shape, like the Angel Trumpet Flower, so I did my best to give it what it wanted.
Next we made our lariats. This involved essentially laying wisps of roving down over a long length of roving, building up thicknesses where we wanted to cut leaves later, and adding in colors for interest. We then felted these as a rope, and tried not to entangle each other's fibers at the same time.
Below is some great video of Carol explaining how to cut the rope part of the lariat to sculpt it!

Then it was time to bead and assemble. Carol was insanely generous in sharing her impressive bead stash with us. I was immediately drawn to some lavender fringe beads that seemed to be just the thing for my lariat. I didn't want to overdo the beadwork, but I still wanted it to have some pop. I also added a little pekoe stitch beading around the edge of one of the petals for some textural interest.

Here are some photos of the finished product. I really love how it turned out. The image on the left is before it was quite done (hence the hanging thread)...the one on the right is pretty much fully realized. One thing that I did that I love is that I split open the "bump" that I had sculpted into the "pod" end of the lariat and sewed in a lava bead. It looks like a primeval seed.
My husband says that they whole thing looks like it is about to assimilate me , like a Triffid. He couldn't be right....could he?

Monday, November 12, 2007
Carol Huber Cypher: Felting Recharge!

So I got to go to two felting workshops this weekend that were a total creative recharge for me! They were both held at Rumpelstiltskin Yarns, in Sayville NY, and they were taught by the felter and teacher extraordinaire, Carol Huber Cypher. She is truly amazing. She was so patient, kind, generous, and knowledgable. I could have done an entire year of workshops with her and still had more questions to ask...but that is just me. On Saturday we made felt beads all day. Now this is something that I know how to do, but WOW! Working with Carol I really got to go back to the basics and refine my technique. Being self taught, you don't often know when you are doing something wrong, or could be doing something better. This was a perfect time to learn!

We made some wet felted beads (the bi-cone, the burgundy and gold disk, the briolette, the coil, and the "mille fleur" cut) ...then in the afternoon we needle felted.
The green and white knobbly bead is needle felted and covered in silk tussah and is meant to emulate a baroque pearl. I also needle felted the grey white and green bead, the tubular white red and blue beaded bead, and the pair of lungs which will get mounted on a pin backing and worn to classes at school (always the bio-teacher doncha know!)
Next post I will show the Felted Flower Lariat that we made on Sunday...Delicious!
Sunday, September 30, 2007
As per suggestions
Wow...a week since I posted, I think that I am going through blog withdrawl, but the grading and teaching has to come first!
Ok...I took many of your suggestions into account, and here is my once change purse, masquerading as:


Ok...I took many of your suggestions into account, and here is my once change purse, masquerading as:
An apple cosy
A vase cosy


A junk receptical


What do you think?
Friday, September 14, 2007
Collaberative Challenge #2

I guess this is kind of the reverse of what I did before. I issued a challenge to someone else, now I am asking you to do it for me! I was playing in the studio, making some felt beads for a commission, and wanted to try a new technique that I had seen in a couple of felting books I had gotten from Japan (more on those later). I wanted to make a change purse, and what I ended up with was this:


It is really cute, about 3.75 inches (9cm) across and 3 inches (7cm) high. What I didn't think about was having a purse frame to fit the top....which I don't. And after some looking, don't seem to be able to find. The inside is totally hollow and a great shade of pink. (Very um....organic...nudge -nudge)
Here is how I made it for those of you who might be interested:
I wet felted several layers of roving around a Styrofoam ball, then cut it open, put in a ball of Styrofoam that was slightly smaller (which I had to cut down from one the same size as the first), then I wet felted it some more with the decoration applied. After that, I put a ball of soft foam inside and needle felted the decoration on again for a little added security.
So, my crafty friends, the question is: What does it become now?
Help me out, I have no idea. Because when I look at it right now, all I see is a change purse...
Wednesday, September 5, 2007
No one will notice...
"Orange, I wouldn't have noticed if you didn't point it out"

Big Orange has something on his face. Little orange has some slight words of encouragement...even if they are somewhat backhanded. Little orange isn't used to this whole being nice thing. This is a 3 inch x 4 inch minature encaustic painting with acrylic underpainting. Just another in my series of "Mean Flower Paintings" that I offer on Etsy.
Subscribe to:
Posts (Atom)


