Showing posts with label sewing. Show all posts

Sunday, October 12, 2008

What I'm bound to do...


What the heck have I been doing with myself?


Honestly? I've been incredibly busy, just not with making as much stuff as I would like.


I have however been growing stuff (which I will share some images of).


Just recently I have gotten a fire in my belly again for the making, and thus I am back with posting to the blog. My latest project is a pair of 18th century stays using the JP Ryan strapless stays pattern.


I decided that it was time to have something to wear in my historical reenactment events that was a bit nicer than my leather jumps, and so wanted a pair of custom made stays, (corset) but was unwilling to pay the $300 and up to have them done. So as a challenge, I am making them myself.


I started on Saturday, October 11, and here is what I got done:


1. -Cut, sewed and fit the fitting muslin (out of muslin of course) which will then be used as the lining
2. -Cut the face and interfacing of the stays out of cotton drill which is a very heavy bodied fabric. (These are meant to be functional, not fancy)
3. -Sewed the face and interfacings together with a contrasting thread (machine stitched) so I could see the work
4. -Sewed up the body of the piece from the sandwiched face/interfacing pieces, once again in contrasting thread, and pressed open


5. -Sewed in the channels for the boning (yeah, machine stitched again, don't kill me, I only have a week to get this done) in a pale gold thread so it will be ever so slightly noticeable.


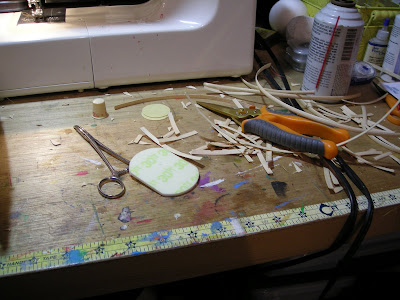
6. -Then I individual fit the bones into the channels. The channels were sewn to be 1/4 inch plus 1/16 ease to fit a 1/4 inch bone. I sewed all the channels freehand without marks, using only the presser foot as a guide, so it was a gamble if the bones would fit. I wanted to use half round basket reeding as my boning material, as this is fairly period correct. I cut each piece, shaped and sanded the ends, and in some cases, shaped the sides to fit the slightly more narrow edge channels. I ended up fitting in 88 bones to make a fully boned corset. I still have two bones to fit on the very ends outside the lacing eyelets....


The detritus of boning....


7. -I used a hammer and round punch to cut in the eyelets on one side (however after testing by sewing the eyelet, it may be too small and I may have to re-cut with a larger punch). I also turned the back edges over and hand basted the edge prior to punching the eyelets.


-WHEW~! All that in one day! What remains to be done is all the handwork...finishing punching eyelet holes, finishing them, sewing in the lining and binding all the edges...as well as checking for final fit and poky bones. I was going to bind in cotton, but I remembered some cream colored lightweight leather that I had laying around, and after consulting "What Clothes Reveal" I saw this was a very common binding material for corsets, and I think it will result in a sturdy finish.


Wish me luck!

Wednesday, January 9, 2008

What have I been doing with myself lately?


You might have noticed that I haven't been posting a terrible lot in the recent past. This is because I have been working my little fingers to the bone costuming our Winter Musical. I thought that I would post a couple snaps of one of our latest creations.


This is Miss Marissa, a lovely young student at my school who is playing Lena in our production of "Singing in the Rain." The gown was sewn by my sainted mother and myself. We mostly completed the bodice together in a couple afternoons and one hectic morning during her Christmas-time visit, I then completed the remainder of the dress last weekend. The wig is constructed from two wigs, that are supported with foam inserts and supplemented with flowers, bows, birds and yes a cage.


And this is just the beginning.

Tuesday, October 16, 2007

Time Travelling again...

Sew, Saturday was a day for making things historic and Sunday was a day for wearing them. For a long time now I have volunteered with a local historical society to teach and demonstrate some of the finer points (or not so fine points) of colonial living. This means demonstrating things that were chores, not pretty foofy things...so I don't wear pretty foofy things.


Sunday was meant to be chilly up here in New York, so I wanted to make a warm jacket that I could wear with my colonial get-up. I have four petticoats and thick stockings already, so keeping my lower half warm wasn't an issue, but I often only wore my chemise and leather jumps on my upper half, and that could be cold.


I dug out a historically correct pattern that I had ordered ages ago for a Carraco Jacket and some variations thereof, and rendered it in a fine red wool herringbone tweed. I didn't have time to finish the sleeve edges, as the pattern called for a winged sleeve, but with all the activity I do while wearing it, I am afraid that it would rip, so I think I will just hem them later.


This is what I ended up with. The back looks a little lumpy, but that is because you are seeing some of my corset lacing through the back, and I just drove home. (That tend to wrinkle things a bit). I really should steam the thing and take another photo.


I would also like to make one that is open fronted with a stomacher in a lovely cotton or silk brocade so I finally do have something "pretty"....not that the Historical Society will ever put me in a position to wear it. I shall never be the lady of the house, always the scullery maid and fish wife.

Monday, July 23, 2007

Yeah, this isn't a Plastic Bag either...

So I wanted a bag I could carry to the city...That wasn't over exposed and carried by the hundreds...


I wanted a bag that I could sling across my body and have it lie relatively flat, would have a strap wide enough not to dig into my shoulder, would have a pocket on the front and one inside large enough to dump my keys and a cell phone into, and that would be cute and packable. It needed to be big enough for a magazine, deep enough for a light sweater to go in it if needed, and sturdy enough to be thoroughly abused.

Not asking much, or so I thought...But I couldn't find that bag. So I made it. Sorry, Anya Hindmarch.


Totally cute. I made it with some great fabric I found a month or so ago, but had no idea what I would do with. The body of the bag is three layers of fabric thick on each side, so it also was a sweet way to use up a little ugly fabric for the middle of the sandwich that no one will ever see.


The lining is so nice that I could potentially turn the thing inside out and get two bags in one, if I wanted to.
Just like this....


I'm not planning on selling these on Etsy, this one is just for me....but I suppose if there was an interest...hmmmm, I could. I did make a pattern as I worked, after all.

At this point I am considering splitting my Etsy shop into two anyway, one shop for the paintings, prints, and collage and another for the fiber based stuff. I'm not sure if this is a great idea. I know others have done it, and I am afraid my shop is starting to look a little schizophrenic. Do you have an opinion on shop splitting?